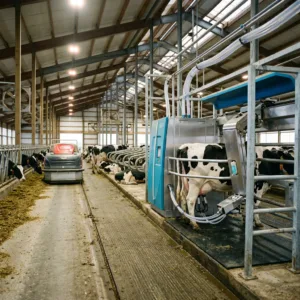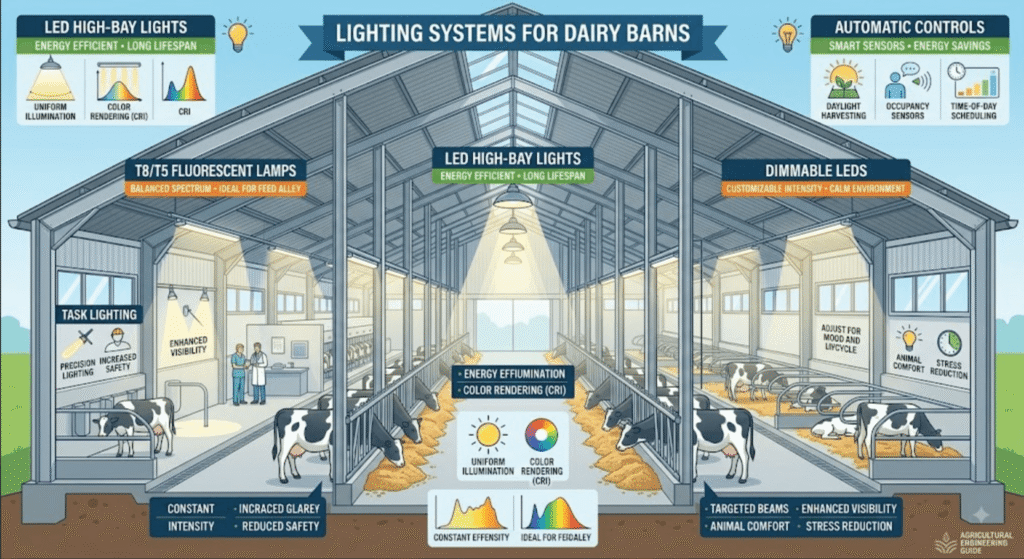
A lighting system for a dairy barn should provide the right amount of light at the right time—not simply make the building look bright. For lactating dairy cows, a common research-based program uses 16–18 hours of light at about 150–200 lux, followed by 6–8 hours of darkness. Dry cows generally need a much shorter photoperiod.
Learn how to design a dairy barn lighting system, including recommended lux levels, cow photoperiod, LED selection, fixture placement, energy costs, and smart controls.
For beginners, barn lighting can look like a simple equipment decision: choose some LED fixtures, calculate how many are needed, and install them along the roof.
In practice, there is more to it.
Light intensity, duration, dark periods, natural daylight, fixture position, glare, and automatic controls all matter. A poorly planned barn may have plenty of electrical power installed but still leave the feed line bright, the center stalls dark, and the cows without a proper night period.
A good plan starts with three practical questions:
How bright should the barn be? How long should the lights operate? Where does that light need to reach?
Quick Answer: Dairy Barn Lighting at a Glance
| Planning Item | Research/Planning Reference |
|---|---|
| Lactating-cow light period | 16–18 hr/day |
| Lactating-cow dark period | 6–8 hr/day |
| Lactating-cow light intensity | 150–200 lux |
| Equivalent intensity | 15–20 foot-candles |
| Dry-cow light period | 8 hr/day |
| Dry-cow dark period | 16 hr/day |
| Typical LED rated life | 50,000–100,000 hr |
| Typical fluorescent rated life | ~20,000 hr |
| Typical fixture height | ≥10–12 ft above cows |
| Reported milk-yield response to LDPP | ~5–15% |
Source: University of Wisconsin–Madison Extension – Lighting in Dairy Buildings in Wisconsin
Beginner takeaway: do not design a barn simply to be “bright.” A properly planned lighting system provides enough light during the daytime program, maintains a genuine dark period, and distributes illumination reasonably evenly where cows eat, rest, drink, walk, and are handled.
1. Dairy Cow Lighting Requirements: Lux, Hours & Darkness
Cows respond to the daily cycle of light and darkness. This cycle is called the photoperiod.
For lactating dairy cows, University of Wisconsin–Madison Extension describes a long-day photoperiod (LDPP) of approximately 16–18 hours of light at 150–200 lux, followed by 6–8 hours of darkness.
Research summarized by the university reports approximately 5–15% higher milk yield under properly managed long-day photoperiod programs.
That number needs to be understood correctly.
It does not mean that replacing old lamps with LEDs automatically increases milk production by 5–15%. The biological response is associated with the properly controlled photoperiod. LED fixtures, timers, sensors, and controllers are tools that help the farm maintain that program.
Michigan State University Extension similarly describes long-day lighting as 16–18 hours at 15–20 foot-candles, followed by 6–8 hours of darkness at 3 foot-candles or less.
Light and Dark Requirements by Cow Group
| Cow Group | Light Period | Dark Period | Main Purpose |
|---|---|---|---|
| Lactating cows | 16–18 hr | 6–8 hr | Long-day photoperiod |
| Dry cows | 8 hr | 16 hr | Short-day photoperiod |
| Heifers | Program varies by stage | Darkness required | Growth/reproductive management |
| Calving/hospital areas | Operational lighting as needed | Avoid unnecessary 24-hour brightness | Observation and treatment |
Sources: University of Wisconsin–Madison Extension and Michigan State University Extension
The most important lesson in this table is simple:
More light is not always better.
Leaving barn lights on for 24 hours may sound productive, but cows need darkness as part of their normal circadian rhythm. Wisconsin Extension reports that continuous 24-hour lighting does not provide additional milk-production benefits and may negatively affect fertility.
For this reason, a timer is one of the simplest but most valuable components in the lighting system.
Instead of relying on a worker to switch lights on and off every day, an automatic controller maintains the schedule through winter, summer, weekends, and holidays.
What Does 150–200 Lux Actually Mean?
Lux measures the amount of light reaching a surface.
1 lux = 1 lumen/m²
Wisconsin Extension provides some useful comparisons:
| Environment | Approximate Illuminance |
|---|---|
| Moonlight | 0.2–1 lux |
| Lactating-cow LDPP target | 150–200 lux |
| Typical office | 300–500 lux |
| Near windows/skylights | 10,000–25,000 lux |
| Direct sunlight | ~100,000 lux |
Source: University of Wisconsin–Madison Extension
For beginners, the practical lesson is:
Measure light instead of guessing it.
A barn may look bright when you stand beside an open doorway, yet the center stalls or feed line can still fall below the target.
A basic lux meter allows the farm to measure actual illumination around cow level at several locations.
This also connects lighting with cow comfort. Cows should be able to move confidently between stalls, water points, feed, crossovers, and milking areas without severe glare or sudden transitions between very bright and very dark spaces.
2. How to Design a Lighting System Across a Dairy Barn
The best time to plan a lighting system is during the original dairy barn design, not after the barn is already built.
Start by dividing the facility into functional zones.
The feeding alley, freestalls, milking parlor, treatment area, dry-cow barn, and equipment room do not necessarily have identical lighting requirements.
Practical Lighting Plan by Barn Area
| Barn Area | Main Lighting Goal | Design Priority |
|---|---|---|
| Lactating housing | Maintain photoperiod | 150–200 lux during LDPP |
| Feed alley | Visibility and feeding activity | Reduce shadows |
| Freestalls | Cow movement and observation | Uniform light, low glare |
| Crossovers | Safe movement | Avoid dark zones |
| Milking parlor | Detailed work | Strong, uniform task lighting |
| Treatment area | Cow inspection | High visibility |
| Dry-cow barn | Short-day photoperiod | Independent controls |
| Calving area | Observation | Separately controllable lighting |
| Equipment/work room | Worker safety | Task-specific lighting |
The 150–200 lux target should not be copied blindly across every square meter of the dairy.
It is primarily a research-based photoperiod target for lactating cows. Milking, veterinary, maintenance, office, and other work areas may require different lighting according to the task being performed.
Fixture Height, Spacing & Natural Light
Fixture position affects how evenly light reaches the cows.
University of Wisconsin–Madison Extension notes that dairy fixtures are typically positioned at least 10–12 ft (3.0–3.7 m) above cows to help reduce glare and shadows.
But mounting fixtures higher does not automatically produce better results.
If fixtures are spaced too far apart, the barn can develop a pattern like this:
Bright → dark → bright → dark
An average lux calculation may look acceptable even though cows experience poorly illuminated areas.
A simple measurement grid can include:
- feed line;
- front of stalls;
- center of stalls;
- crossover;
- water station;
- cow return alley;
- holding area.
Wisconsin Extension researchers used measurements at approximately cow-eye level when evaluating Wisconsin dairy buildings.
Natural daylight also makes a large difference.
In their field observations, naturally or hybrid-ventilated barns could average more than 1,200 lux, while cross-ventilated buildings were generally below 400 lux. Part of one cross-ventilated barn even dropped below the 150-lux threshold.
Source: University of Wisconsin–Madison Extension dairy lighting study
This is a good example of why one lighting plan cannot simply be copied from one dairy to another.
Open sidewalls, ridge openings, curtains, translucent panels, roof design, barn width, ventilation layout, and installed dairy barn equipment can all change light distribution.
A naturally ventilated barn may need artificial lighting mainly during early mornings, evenings, cloudy weather, and short winter days.
A wide enclosed cross-ventilated barn may depend much more heavily on artificial light throughout the building.
The lighting system should therefore be designed together with ventilation, electrical infrastructure, feeding equipment, cow traffic, and the overall barn layout.
3. LED vs. Fluorescent vs. HID Dairy Barn Lights
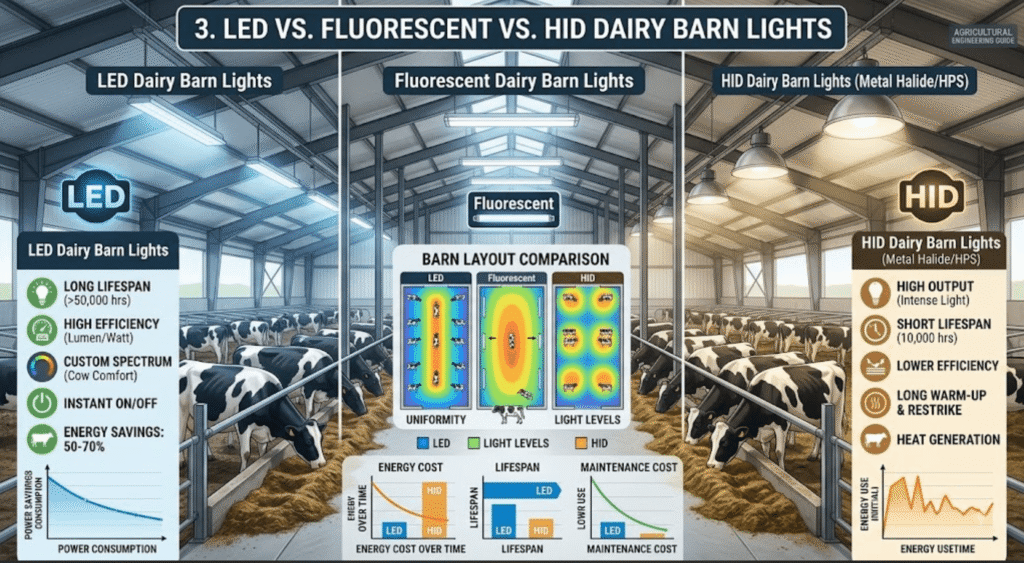
For most new dairy projects, LED technology is now a practical starting point.
The reason is not just brightness.
Dairy barns are difficult environments for electrical fixtures. They can contain humidity, dust, insects, ammonia, temperature changes, wash water, and corrosive conditions.
A household lamp designed for a dry room is very different from a fixture expected to operate above cattle for years.
Dairy Barn Lighting Technology Comparison
| Feature | LED | Fluorescent | HID |
|---|---|---|---|
| Typical rated life | 50,000–100,000 hr | ~20,000 hr | Varies |
| Energy efficiency | High | Moderate | Generally lower than modern LED |
| Instant start | Yes | Usually | Often slower |
| Dimming/control | Excellent with compatible fixture | Limited/moderate | Limited |
| Frequent switching | Good | Less ideal | Less ideal |
| Smart-control integration | Easy | Possible | More difficult |
| New dairy projects | Usually preferred | More common in existing installations | Mainly legacy/special applications |
According to University of Wisconsin–Madison Extension, LED fixtures typically have rated lives of approximately 50,000–100,000 hours, compared with roughly 20,000 hours for fluorescent lighting.
HID systems such as metal-halide and high-pressure-sodium lamps can illuminate large spaces, but they are more energy-intensive and slower to reach full brightness.
Consider a lamp operating 16 hours per day: 16 hr × 365 days = 5,840 operating hr/year
The simple theoretical comparison becomes:
| Rated Life | Operating Hours/Year | Theoretical Years |
|---|---|---|
| 20,000 hr | 5,840 | 3.4 yr |
| 50,000 hr | 5,840 | 8.6 yr |
| 100,000 hr | 5,840 | 17.1 yr |
Important: these are mathematical comparisons based on rated hours, not guaranteed real-world fixture lifetimes.
Heat, electrical quality, moisture, corrosion, fixture construction, LED-driver quality, dirt, and maintenance can shorten actual life.
Do Not Choose a Dairy Light by Watts Alone
A common beginner mistake is comparing fixtures only by wattage.
A 100 W LED does not automatically provide the right barn illumination.
Instead, compare:
| Specification | What It Tells You |
|---|---|
| Lumens | Total light output |
| Lux | Light reaching the target surface |
| Watts | Electrical power consumed |
| lm/W | Lighting efficiency |
| Beam angle | How widely light spreads |
| IP/environmental rating | Dust/moisture resistance |
| Rated life | Expected operating life |
| Dimming capability | Compatibility with automatic controls |
The final test is still the actual lux level after installation.
Maintenance should also influence equipment selection.
A fixture may look excellent on a specification sheet, but if every cleaning or repair requires difficult access equipment, maintenance is more likely to be delayed.
Dust and dirt reduce useful light output over time. Fixture inspection and cleaning should therefore become part of routine maintenance, just like fans and other dairy barn equipment.
4. Lighting Energy Cost, Controls & Smart Dairy Farming
Lighting can represent a meaningful part of a dairy’s electricity use.
Wisconsin Extension cites earlier dairy energy data in which lighting accounted for approximately 17% of electricity consumption in tie-stall barns and 26% in freestall barns.
The exact percentage on today’s farm can be very different because energy use depends on ventilation, milking systems, milk cooling, climate, barn design, automation, and other equipment.
Still, the numbers show why efficient lighting deserves attention.
Planning Example: 60-Fixture Dairy Barn
This is a calculation example, not an industry-average operating cost.
Assume:
- 60 LED fixtures
- 100 W/fixture
- 16 hr/day
- $0.15/kWh electricity
Connected load: 60 × 100 W = 6,000 W = 6 kW
Daily electricity: 6 kW × 16 hr = 96 kWh/day
Annual electricity: 96 × 365 = 35,040 kWh/year
Annual cost: 35,040 × $0.15 = $5,256/year
| Calculation Item | Example |
|---|---|
| Fixtures | 60 |
| Power/fixture | 100 W |
| Connected load | 6 kW |
| Operation | 16 hr/day |
| Daily electricity | 96 kWh |
| Annual electricity | 35,040 kWh |
| Assumed electricity price | $0.15/kWh |
| Calculated annual cost | $5,256 |
The example makes one thing clear: controls can matter almost as much as fixture efficiency.
If daylight already provides sufficient illumination at midday, operating every lamp at full power can waste electricity.
A more efficient lighting system can combine:
timer + daylight sensor + dimming + zone control
A daylight sensor measures available natural light. If the barn already exceeds the target, compatible LED fixtures can dim. When daylight falls, artificial lighting increases.
This is where barn lighting begins to connect with smart dairy farming.
From a Simple Switch to Smart Control
| Control Level | Typical Equipment | Main Benefit |
|---|---|---|
| Manual | Wall switch | Lowest initial cost |
| Basic automatic | Timer | Consistent photoperiod |
| Zoned | Timer + separate zones | Different cow-group schedules |
| Efficient | Timer + daylight sensor | Lower unnecessary operation |
| Smart | Sensors + dimming + controller | Automatic adjustment |
| Integrated | Farm-management connection | Wider operational visibility |
For many farms, a timer plus properly divided zones already provides a major improvement.
A complicated IoT platform is not required to get the basics right.
The priority should be:
correct intensity → correct duration → proper darkness → even distribution → efficient control
More advanced farms may combine lighting information with environmental sensors, milking records, or a cow monitoring system.
For example, managers could compare seasonal light conditions with cow activity, resting patterns, feeding behavior, or other barn data. The lighting controller does not necessarily need to control the monitoring platform; the value can simply come from comparing reliable datasets.
That is a practical form of smart dairy farming: using measurements to make management decisions instead of relying only on observation.
5. How to Choose, Install & Check a Dairy Barn Lighting System
Before buying fixtures, walk through the barn—or study the construction drawings—and build a simple lighting plan.
Do not begin with:
“How many lights should I buy?”
Begin with:
“What does each part of this barn need?”
Step 1: Separate Cow Groups
Lactating and dry cows should not automatically share the same photoperiod.
A common lactating-cow program is:
16–18 hr light + 6–8 hr dark
For dry cows, Wisconsin Extension recommends:
8 hr light + 16 hr dark
Separate electrical zones make these different programs much easier to manage.
Step 2: Establish Target Light Levels
For lactating cows under a long-day photoperiod, use 150–200 lux as a research-based starting point.
Then identify areas that require task-specific lighting, such as the milking parlor, treatment area, workshop, and equipment room.
Step 3: Measure Natural Daylight
Do not judge the barn from a single sunny afternoon.
Where practical, check light levels during:
- early morning;
- midday;
- evening;
- cloudy conditions;
- different seasons.
A barn that looks bright at noon in June may be completely different at 5:00 a.m. in December.
Step 4: Select Agricultural-Grade Fixtures
Compare more than purchase price.
Check:
- lumens;
- efficacy;
- beam distribution;
- rated life;
- moisture/dust protection;
- corrosion resistance;
- operating-temperature range;
- dimming compatibility;
- warranty;
- electrical certification required in your market.
Step 5: Coordinate Fixture Locations With the Barn
Columns, ventilation ducts, fans, curtains, feeding systems, pipes, and other dairy barn equipment can block or change light distribution.
This is why lighting should be included early in dairy barn design rather than treated as the final electrical job.
Step 6: Install Automatic Controls
At minimum, use a reliable timer when operating a controlled photoperiod.
Michigan State University Extension reported on a 100-cow demonstration dairy that installed LED fixtures, sensors, and automated controls for long-day lighting.
The demonstration reported an 8% increase in milk production over 12 months while MSU also considered other farm and weather factors.
This should be treated as a demonstration-farm result—not a guaranteed result for every dairy.
Installing LEDs alone is not the biological intervention. Maintaining the appropriate photoperiod is the important part.
Step 7: Measure the Finished Installation
Do not assume the job is finished when the electrician switches the lights on.
Measure it.
| Final Check | Question to Ask |
|---|---|
| Intensity | Are lactating areas reaching the target lux? |
| Uniformity | Are there major dark zones? |
| Glare | Are fixtures uncomfortable at cow/worker eye level? |
| Timer | Does the schedule start and finish correctly? |
| Darkness | Is the dark period actually dark? |
| Daylight control | Are lamps operating unnecessarily? |
| Maintenance | Can fixtures be safely cleaned? |
| Expansion | Can future barn sections be added easily? |
A lighting system should be commissioned just like other important farm infrastructure:
install → measure → correct → monitor
Five Common Dairy Barn Lighting Mistakes
| Mistake | Better Approach |
|---|---|
| Lights operating 24 hours | Maintain a genuine dark period |
| Selecting only by watts | Compare lumens, lux, efficacy, beam and durability |
| Measuring under one fixture | Measure multiple representative locations |
| One schedule for all cow groups | Separate lactating and dry-cow zones |
| Ignoring natural daylight | Integrate daylight with artificial-light control |
These problems are normally cheaper to prevent during construction than to correct later.
Frequently Asked Questions
How many hours of light do lactating dairy cows need?
A commonly recommended long-day photoperiod is 16–18 hours of light followed by 6–8 hours of darkness. University of Wisconsin–Madison Extension recommends approximately 150–200 lux (15–20 foot-candles) during the light period.
Should dairy barn lights stay on all night?
No. Research-based long-day programs include a genuine dark period. Continuous 24-hour lighting does not provide the same benefit and may negatively affect fertility.
How much light should a dairy barn have?
For lactating cows under a long-day photoperiod, 150–200 lux is a commonly cited research-based target. Task areas such as treatment and milking spaces should be designed according to the work performed there.
Are LED lights better for dairy barns?
LEDs are generally well suited to modern dairy applications because of their efficiency, long rated life, instant starting, and compatibility with timers, sensors, and dimming. Wisconsin Extension reports typical rated lives of 50,000–100,000 hours, but fixtures still need to be suitable for the barn’s moisture, dust, temperature, and corrosive environment.
How do I know whether my dairy barn has enough light?
Use a lux meter and measure multiple representative locations around cow level. Include the feed line, stalls, crossovers, water points, and other important areas instead of measuring directly beneath one fixture.
Evidence Used in This Guide
| Key Recommendation / Evidence | Source |
|---|---|
| 16–18 hr light + 6–8 hr dark | University of Wisconsin–Madison Extension |
| 150–200 lux lactating-cow target | University of Wisconsin–Madison Extension |
| 8 hr light + 16 hr dark for dry cows | University of Wisconsin–Madison Extension |
| Reported 5–15% milk-yield response under LDPP | University of Wisconsin–Madison Extension |
| 15–20 foot-candles for long-day lighting | Michigan State University Extension |
| 50,000–100,000 hr typical LED rated life | University of Wisconsin–Madison Extension |
| 100-cow long-day lighting demonstration | Michigan State University Extension |
Engineering note: These lux levels, photoperiods, fixture heights, and operating examples are useful planning references. Final fixture quantity, mounting height, beam distribution, electrical design, moisture protection, emergency lighting, and code compliance should be confirmed from the actual barn dimensions, fixture photometric data, and applicable local electrical/building requirements.
Conclusion
A good lighting system is not simply a collection of bright LED fixtures hanging from the barn roof.
It combines:
light intensity + photoperiod + darkness + distribution + daylight + automatic control
For lactating cows, 16–18 hours of light at approximately 150–200 lux followed by 6–8 hours of darkness is a useful research-based starting point. Dry cows require a different photoperiod, making separate lighting zones particularly valuable.
LED technology can lower energy consumption and maintenance requirements while making timers, dimming, daylight sensors, and automatic control easier to implement. But buying LEDs alone does not create a good lighting plan.
The real goal is to provide the right amount of light, in the right place, at the right time.
When lighting is considered early in dairy barn design, it can work naturally with cow comfort, ventilation, feeding equipment, milking areas, other dairy barn equipment, a cow monitoring system, and the wider transition toward smart dairy farming.
For a beginner planning a new dairy barn, remember one simple process:
Design first → install second → measure third.
If the final lux measurements, light distribution, dark period, and operating schedule match the original plan, the lighting system is doing what it was designed to do.